Friday, October 6, 2023

Succulent Pumpkin Tutorial

It is officially fall y’all! The week transitioning from summer to fall is always my dead period at work with system and funds shutdown…so lucky for you I have time to post a DIY tutorial. Since my last post, I had my third daughter who just turned 14 months. HOLY COW! The two older girls absolutely adore her and she is quite the daddy’s girl (which is cute but secretly super annoying to mom here). I also opened a side hustle craft business (Belle Terre Creative Market & Events). Which if you don’t follow me on Instagram, the handle is @belleterremarket. To be honest, the first year was harder than I expected. Very hard gaining vendors and followers. I think I’ve found a niche though and really enjoy hosting crafting workshops at different venues like coffeeshops, breweries and boutiques. It has really been nice meeting new people and enjoying their creativeness and fun personalities. The succulent pumpkins have been one of my favorite workshops to host because #1 I LOVE FALL, #2 they last a long time, #3 they are fairly easy to create and take care of.

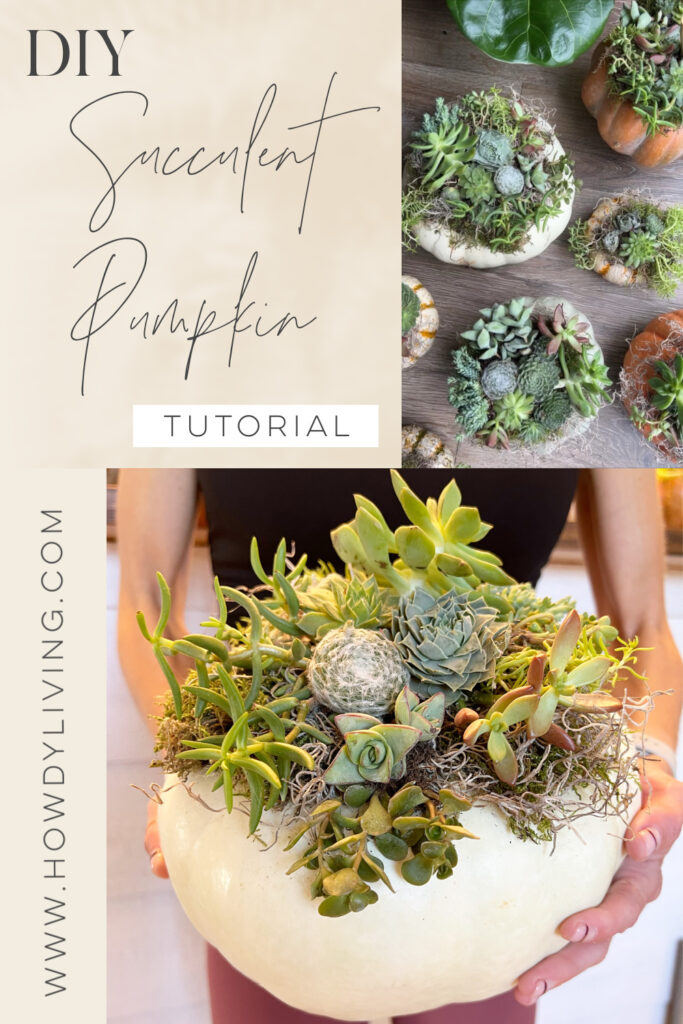
I did post a reel @howdyliving last year but it didn’t get many views, so I’m officially making a post, tutorial and a refreshed HOW TO HOST A SUCCULENT PARTY video! It really is the BEST fall craft. Great friends, cocktails, fall weather and making pumpkins makes a super special beginning of the holidays party, but this is a fun craft solo as well! So here are the directions either way you want to go 😉

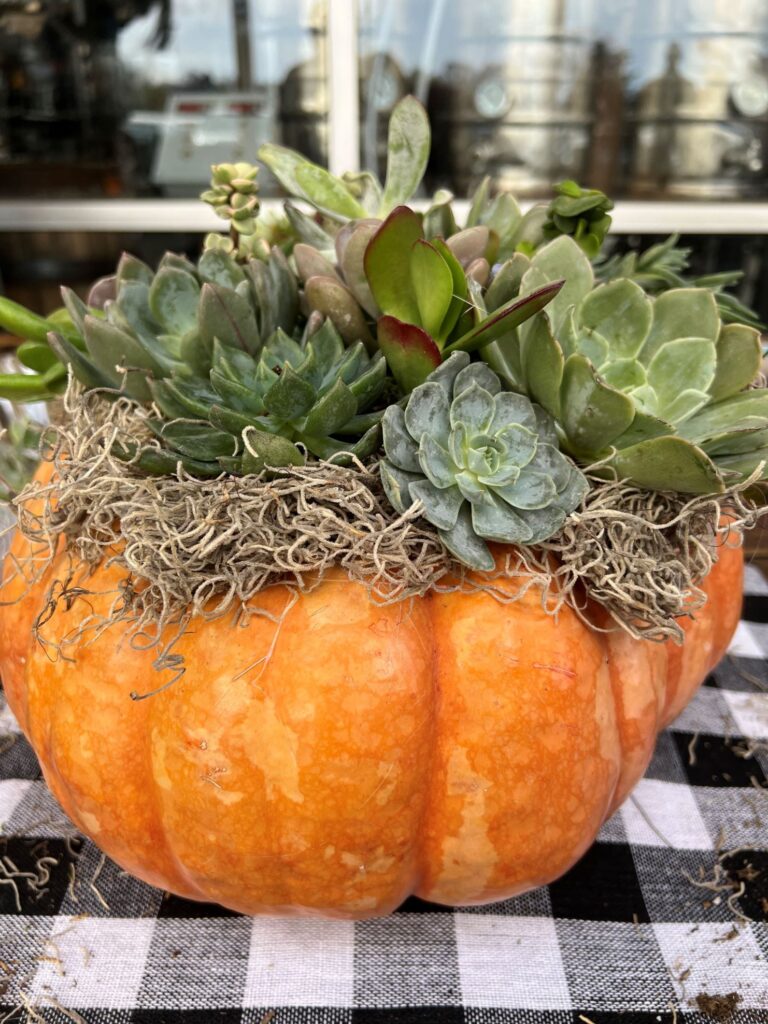
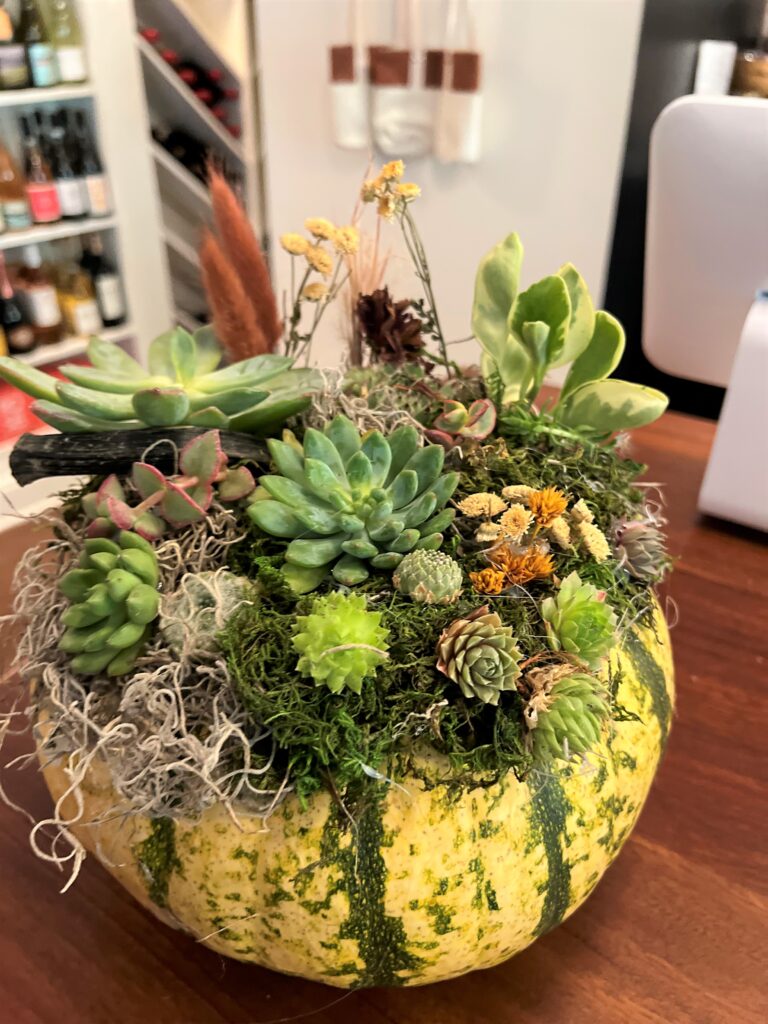
First off, grab a pumpkin. You can do this with any size and type of pumpkin you like. I like a medium-sized heirloom pumpkin personally. You will then need either spray adhesive or a hot glue gun. You will then need spanish moss and green preserved moss. You can use 2″ potted succulents that have soil and roots (you will remove from nursery pot and shake excess soil off to expose roots) or succulent cuttings and/or small hen and chicks versions. I personally like to mix all 3 together. The rooted plants provide a basis for the others to root and a little more oomph. But you can use whatever you like and even incorporate dried flowers and other fall accents. I personally love Mountain Crest Gardens for sourcing succulents. Their plants are beautiful and always ship well. However, if you want a lower quantity or quicker delivery Home Depot or Amazon have great options as well.

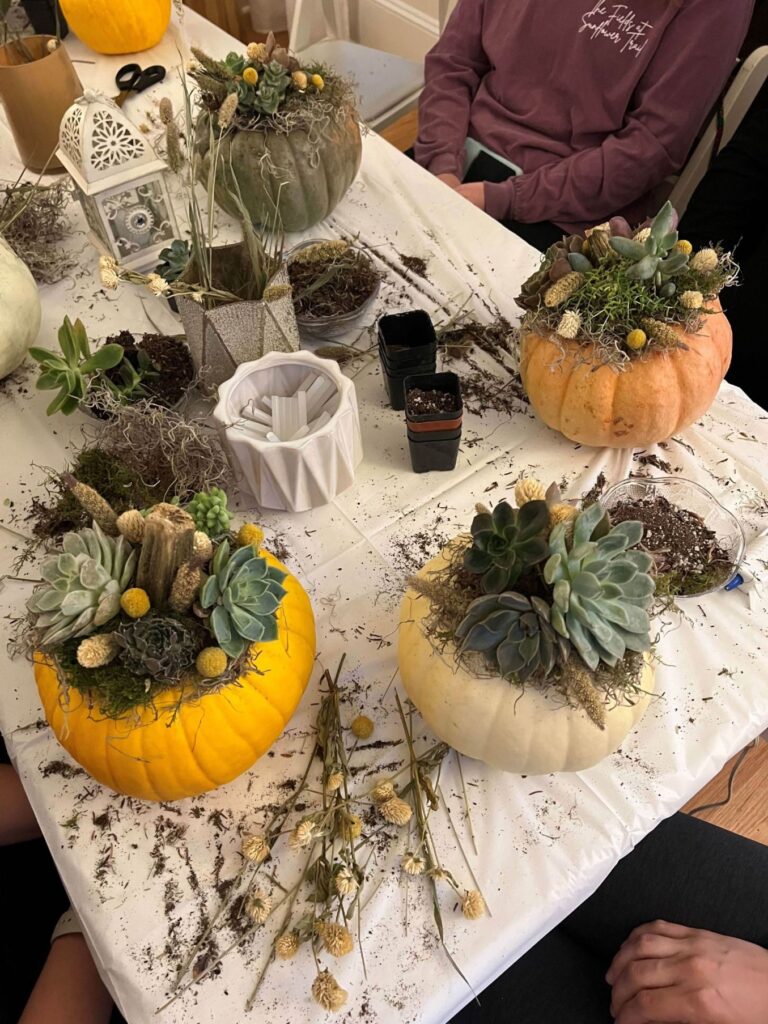
First clean your pumpkins with dawn dish soap, diluted bleach or thieves essential oil and let them dry. Next glue your moss around your pumpkin stem. Then start placing your larger succulents with glue. Try to not glue directly on stem/roots but around. Finally complete your pumpkin by filling in gaps with the smaller succulents, dried florals, dried pampas, dried pods, feathers, etc. You can really use whatever you like!

To maintain, spritz once a week to moisten the moss and hydrate any new little roots that might have formed. Give it bright, indirect light by setting it near a window indoors or on a sheltered deck or balcony (out of frost). Depending on succulent varieties used and its location, your centerpiece can retain its color and last for about 1-3 months. When ready to trash pumpkin, you can cut the top off with succulents and plant in a container.

Monday, April 4, 2022

{No Bake} Pregnancy Date Energy Balls

These pregnancy date energy balls, pregnancy protein balls, nut and fruit balls, or energy balls, (whatever you want to call them!) are an excellent snack option for pregnant mamas because they are high in protein and healthy fats which we need more of during pregnancy. Studies also link date consumption to shorter, less painful births that can help women have labors with less interventions. Eating dates throughout pregnancy is highly recommended by doulas, midwives and other natural birthing practices. BUT, these don’t have to just be for pre/postnatal purposes because boy my husband and kids LOVE them too. And nutritious for everyone!

If you’ve had a larabar these are what they are most similar to. I just like the simple ingredients and being able to change flavors and add “toppings” of my choice. These also are super wonderful to freeze and prepare your home with easy snacks for the newborn baby phase. You can also use the base idea of dates, nuts, and then modify for goals. Like for breastfeeding, add wheat germ, flax seed, brewers yeast, or more oatmeal. All milk supply boosting ingredients! I personally love adding collagen protein for all the amazing benefits (skin, hair, joints, etc.), but if you don’t want to include it, you can substitute with a vegan protein or just leave it out, that’s fine too! *Also – check with your doctor before starting any new nutritional supplements while pregnant*

Really these couldn’t be more simple as everything goes into the food processor or Vitamix and you can portion and roll the balls to your size preference. I do not soak the dates as some recipes say, so it’s from pantry to homemade energy balls in less then 10 mins. Really I eyeball the consistency. You don’t want them too dry where they will not stick together. If this happens add more dates, more peanut butter, or if you want sweeter as a dessert replacement, add some honey and this will definitely help bind together. 

{No Bake} Pregnancy Date Energy Balls

Energy bites are the perfect, quick, and healthy snack for anyone! But the date and protein benefits for pregnancy are fantastic! Energy balls made with date fruit, chia seeds, nuts, and peanut butter. Packed with protein and healthy fats this pregnancy snack will keep you full longer. 
Prep Time5 mins
Total Time5 mins

Ingredients

  • 1 cup pitted medjool dates, pits removed (roughly 10-11 dates)
  • 1/2 cup nuts (I used walnuts)
  • 1/4 cup oats (old-fashioned, gluten-free, etc)
  • 1/3 cup creamy peanut butter (I use no sugar added but your preference or could sub for another nut butter)
  • 1 tbsp chocolate collagen peptide powder
  • 1/2 tbsp chia seeds
  • optional roll “toppings” – sweetened or unsweetened coconut flakes, chocolate chips, chopped nuts

Instructions

  • Really these couldn’t be more simple as everything goes into the food processor or vitamix and you can portion and roll the balls to your size preference. I do not soak the dates as some recipes say, so it’s from pantry to homemade energy balls in less then 10 mins. Really I eyeball the consistency. You don’t want them too dry where they will not stick together. If this happens add more dates, more peanut butter, or if you want sweeter as a dessert replacement, add some honey and this will definitely help bind together.
    Makes about 10-11 bite sized balls.
Wednesday, January 26, 2022

Farmhouse Pantry Renovation

I was absolutely embarrassed of the state of my pantry. I think between the normal kids snacks, the holiday goodies, and my husband starting a new health regiment the pantry was completely overloaded. (Also side note, being pregnant and trying to cook healthy everyday to support my husband, total drag haha. All I want is carbs, fast food and all the things I normally don’t indulge in.)

I had searched Pinterest for some ideas and there were a lot of wood covers for existing wire racks, so I took that idea and we created a similar look using 1x10x8 and 1x2x8 whitewood boards we purchased from Lowes and getting rid of the wire completely. First, remove all existing racks that you are planning to replace. Fill all the holes with spackle, wait until dry and sand until smooth. I painted the entire pantry with leftover SW Agreeable Grey paint. For the wood I stained before we cut to size so there were less to do. I used the Varathane Jacobean stain and a stain pad just one coat. For the frames, we used the 1×2 boards and drilled into the studs for best stabilization. Then the bottom three shelves we doubled the 1×10 boards so they ended up being almost 20″ wide. The top three shelves were the single board on the frames. To create a complete look, I we created a front cover with the 1×2 board. You can space the shelves what you think best fits yours needs, we created various lengths so we had room for large and small items.

Once the shelves were complete came the organizing and a lot of brain power to revamp the chaos. I started with The Lodge outlet and found 2 hydrangea oil pourers and two sunflower glass jars that I decided to put our citrus in. Found a small basket for my potatoes and onions, which I was so happy to get these out of my fruit basket area. I also ordered a few jars so I could label all my baking supplies in their new containers. Aren’t these pantry labels adorable!?!?! Finally reused three baskets I already had for alcohol on the bottom and one for ALL the kid snacks that I could literally pour in and not care about the organizing. I searched a lot to find reasonably priced organization but in reality you don’t need too much (yes it’s not the perfect blogger pantry that you drool over where everything is place perfectly in it’s own container and labeled). But for me, this was a vast improvement. I would say the total price of this pantry with wood, supplies, specialty containers and labels ended up being around $350.

I’ve talked to a few other moms and through COVID organizing and decluttering has been a complete way of life. It’s something we can control and make us feel less scattered. I am in total agreeance. If I could have my way I would spend a whole week organizing and tossing things. There is something so freeing and really does change your mental game of not looking at disorganized crap everything! So get your booty up and focus on one small area of cleaning and organizing. I’m sure it will change your mood.

Thursday, May 6, 2021

Oak Stair Renovation

The stair renovation project is FINALLY complete and let me tell you it was a LONG one. My quote to do all the stair work was almost $3,000 so I decided to tackle this true DIY style. This project took total about 2 months with a lot of learning curves, OH SHITS, and normal DIY life with children. I also said aloud multiple time, “This is why people have DIY blogs, to tell people what not to do”.

I did a test run on the upstairs landing into the playroom, which tuned out great. I was even able to sand down and make the dog chewed tread less noticeable without having to pay to have the tread replaced. After testing everything I felt confident in moving forward, but boy was I not ready for the full stairs haha.

First, we removed the posts right before we had the new LVP floors installed.  Then figuring out how to attach the first craftsman post took about a week to work math and geometry. The biggest lesson learned was that Willie and I should have paid attention more learning about angles and school…because WOW…not good. This I can’t really give much a tutorial because it was complete guessing and about 50 tries on the cuts. But first off, we did cut the posts down about 9” because they were way too tall. Then, we used the old banister as a template and started with that cut using a jigsaw saw. These posts were especially hard because it was two pieces, it had the post insert that went into the bottom craftsman box. We debated about just having the post, but I thought the outer molding made it look so much more custom, so onto the a million cuts of fitting the two together went.

But once those were up and steadied the banister itself I started sanding the banisters by hand with 60 grit to get down to the bare wood, then sanded everything with 220 grit for a smooth finish. I used the General Finishes Oil Base Gel Stain (Java) that I used on my last house but tried to wipe the excess more because I wanted to see the wood grain. After the second coat I realized the color was not matching my floors. It had a red tint which wasn’t as noticeable last house maybe because I put it on so thick it was a dark reddish brown. So I decided to switch to a Miniwax gel stain in a dark brown color, then all HELL broke loose. I’m not sure it was the change in brand or me and gel stain don’t get along but even after waiting at least 12 hours between coats, I found the stain super sticky and then with me trying to wipe the stain it was blotchy and looked like an absolute disaster. Sooooo I re-sanded everything. About an extra 3 hours of extra work. After everything was sanded down I went with what I had used on the playroom floors (Stain and Finishing Oil All in one Cappucino) and just tried to be extra careful since this is very thin liquid compared to the gel. It will splatter and just having my house foyer painted I was like ughh what was I thinking (facepalm). *Note – after completing the stairs and knowing I wanted the wood grain, I would have diluted the oil with the natural color of stain from the beginning and do two or 3 coats with the dilution. It brings more of a sheen and not having to worry as much wiping excess and creating light/dark areas* But after 2 coats of the 100% cappuccino and letting it sit 5 minutes before wiping excess, I thought they looked SO much better than the gel that it was worth it and move onto staining the new posts, which I’m still debating painting white, but for now that are staying stained.

Once everything was dry, I gave it a good week to dry, then Willie and I took an entire Sunday to sand the stairs. We tried buying a “sand-less sander” which did not work at all. So I went back to my $30 orbital hand sander “ol’ trusty rusty best sander EVER”! It’s tiny but mighty and literally has done about 15 projects for me. I did the sanding while Willie followed me with the shopvac. We used the same 60 grit and 220 grit method and had to hand sand all the edges (which took FOREVER). After all the sanding was complete, they stayed bare until the following weekend. Which just as a caution if you have a large dog (another lesson learned) they can scratch the bare wood deeper which will show through your first coat of stain, which you will have to re-sand those treads affected. We also did all the stain coats alternating stair treads so we could walk up the stairs. We marked the “good” stairs with a little blue tape making kids only go on the blue marked stairs. However, I still ended up with two stairs with little finger prints of someone who decided to step on blue but crawl up on a wet hahahaha…Just a little side note there…Anyways, 1 coat pure cappuccino and it looked very matte to me which is when I tried the 50/50 combo of cappuccino and natural stain. This combo I think would have been what o use for the entire project. Easier to manage the excess and wood grain transparency and added sheen. Brush on the stain, let sit and wipe off the excess with a staining pad. This is very important, lint is a real thing! Use the staining pads. Also use the green tape not the blue tape.

Once all your stain is dry. Give it at least 5 days from the last group of stairs you did. You are ready to paint the stair risers WHITE! I used Sherwin William ProBlock Oil-Based and their white Emerald Urethane Trim Enamel. USE THE GREEN TAPE. I used a chip brush for all the corners and then a small roller for the rest of the riser. One coat of primer and 2 coats of the white enamel paint. Primer dried fast maybe 2 hours but give the paint at least 8 hours between coats. Remove tape about an hour or two into dry time. Don’t let dry fully but you don’t want wet paint everywhere.  LAST STEP = chalk all the edges. I taped a very small strip and Willie chalked and used his finger to smear. With the chalk, you end up with professional straight lines. This step is the GAME CHANGER. Covers all the bleeds and makes it look so complete. Then really last step, if you were like me, use your enamel white paint to paint any baseboards, molding and spindles that may have received overspray from the stain. And VOILA, DIY stair renovation for about $500, saving about $2,500 for FUN! 

$109 x two Natural Red Oak Stair Newel Post

$100 brushes/staining pads/tape/rollers/sanding disks

$75 Fusion Mineral Paint Products (2 cans of cappuccino and 1 of natural – $25 each)

$100 Sherwin William ProBlock Oil-Based and Emerald Urethane Trim Enamel (you will have TONS left, I bought the gallons)

TOTAL =  $500.00 (ish)

We invested in a jig saw for cutting the posts ($150) so if you don’t have, this is an extra expense but we will use for other projects. And I already hand the orbit sander, but if you don’t get yourself one like this (around $30) and I LOVE Harbor Freight for these types of items, brushes, stain pads, sanding disks, etc. Their prices are amazing!

Hope you enjoyed laughing and learning from me!