Time Blocking 101: How to Organize Your Entire Week in Google Calendar
Time Blocking Google Calendar is one of the easiest ways to stay on track throughout the day. No more distractions—this powerful time management strategy will keep you laser focused!
If you often scratch your head at 9 pm, wondering why your to-do list seems just as long as when you started—even though you were busy all day—time blocking is going to CHANGE. YOUR. LIFE.
This is hands-down my favorite productivity strategy!
And it's so much more than a pretty color-coded calendar.
Although let's be honest, color coding everything is half the fun!
When you time block your week, you can…
- Plan more easily. When you sit down to plan out your weekly routine, time blocking is going to make such a difference. You'll know exactly what to do and when. No more winging it!
- Say goodbye to distractions and give yourself permission to focus on one task (or task type) at a time.
- Approach each day with a more realistic mindset. As much as we wish we could carve out more hours in a day, time is finite. Time blocking gives you a visual representation of the hours you actually have so you can use them well.
Time blocking is especially helpful if you find yourself jumping around from task to task, leaving a string of half-finished projects in your wake… or you feel like you're constantly playing defense against what feels urgent, but struggle to make progress on the things that will have the most impact.
In other words, you'll become proactive about your time, rather than reacting to all the balls thrown your way. And at the end of the day, you'll have margin to spare!
What is Time Blocking?
Time blocking is exactly what it sounds like—you “block off” a portion of your day with a specific start and end time.
You can dedicate that block to…
- a certain event,
- one of your daily routines,
- a specific task,
- or a set of tasks.
It's that simple!

Lest you have nightmares of following a rigid minute-by-minute schedule with only 5 minute breaks in-between, let me assure you—assigning a time to everything you do in a day is NOT realistic. I don't recommend it!
There's actually a sister strategy to time blocking called task batching that groups smaller, similar tasks into ONE time block.
This saves you from scheduling every little task, like folding laundry, into your calendar. You can just add it under the HOME time block along with meal prep and cleaning.
By knocking out a bunch of similar tasks at once, you save a ton of time working in the same “mode” rather than jumping back and forth between unrelated tasks.
Ready to give time blocking a try?
It truly is SO easy to get started, but I'll guide you through the steps and best practices so you can be successful from the very beginning.
The Step-by-Step Guide to Time Blocking
This site is reader-supported. When you purchase through our links, we may earn an affiliate commission.
Step 1: Choose the Right Tool
You can time block on any digital calendar (like Google Calendar) or a paper planner with an hour-by-hour schedule (like the Erin Condren LifePlanner or Living Well Planner). It's really up to you what you prefer!
I personally like time blocking digitally on a Google Calendar weekly view.
I've tried Cozi, iCal, and Cron, and always come back to Google Calendar because it's FREE, easy-to-use, and it is super easy to move blocks around if a project takes longer than normal. AND if I mess up, this recovering perfectionist doesn't have to deal with white-out tape. I just delete the block!
Plus, I love using the Gcal widget on my phone. I can always see what time block is coming up next and easily add an upcoming event.
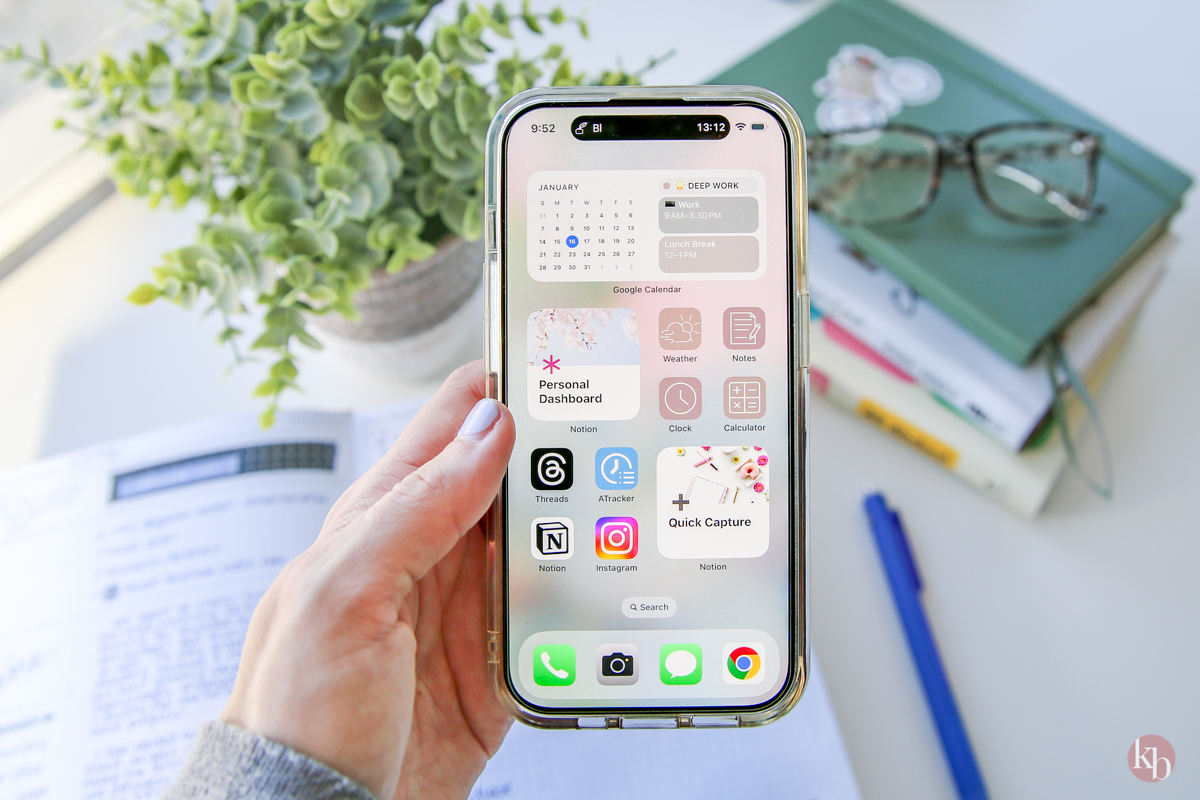
Need to declutter and organize your phone? Here are the other phone widgets and apps I use to create a beautiful home screen.
As of 2024, I'm also time blocking my individual day using a Hemlock & Oak Daily Planner.
When you use two separate tools to essentially track the same thing, it might seem like this is just extra work or a duplicate of what I've already done. But I don't see it that way.
Each time blocked location serves a different purpose.
- In Google Calendar, I time block one full week at a time. On Friday afternoon, I look over next week's schedule, tasks, and projects and arrange my week based on how everything fits. And if it doesn't, then I need to drop a few things! Again, the digital nature of this method allows me to move blocks wherever I please, without worrying about covering up mistakes with washi tape.
- In my H&O Planner, I only time block the major parts of my day. I especially want to see where I'm fitting in a workout, what my work hours will be, and any other time-sensitive events like when a YouTube video publishes. I do this every evening before the next day and reference my Google Calendar to see if anything needs to change before I put it down in pen.
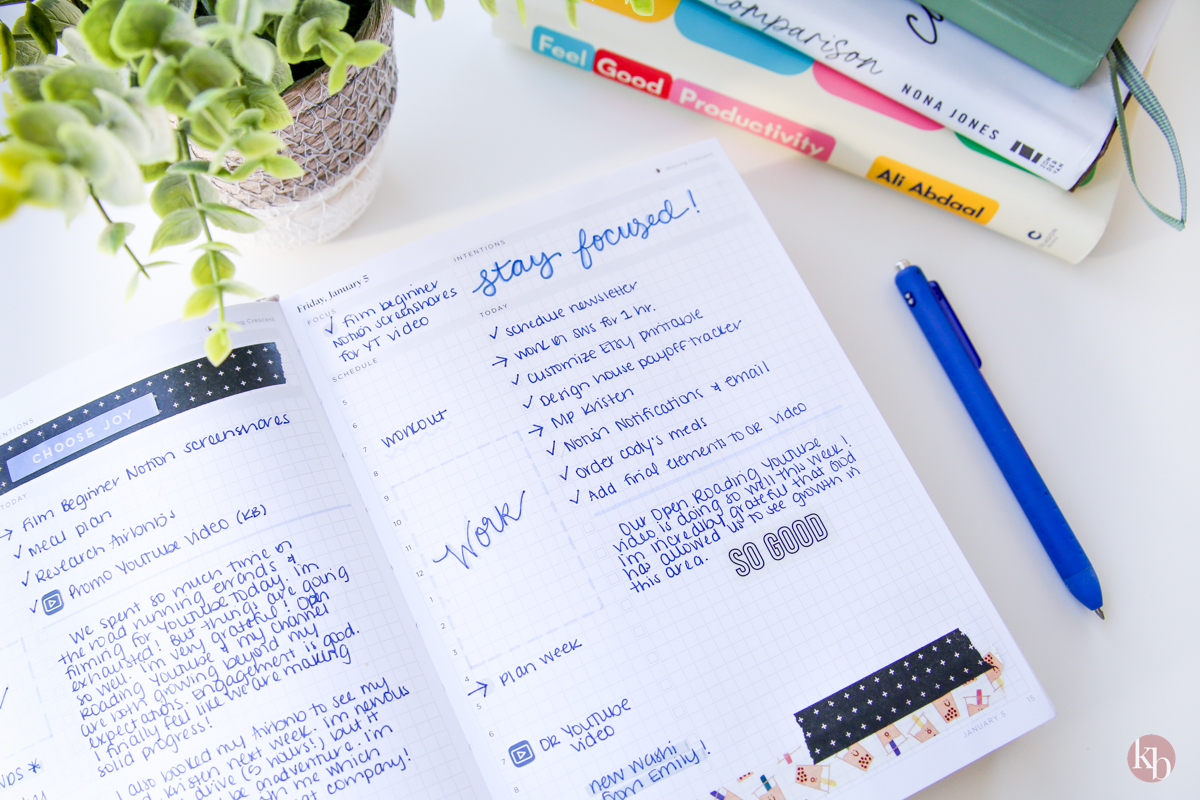
I took forever to commit to this planner purchase, but now I ADORE it! Coming from a bullet journaling background, I love the extra room to make a to-do list as long or as short as I like and do some daily journaling, while still using a dated planner.
If you're interested in trying a Hemlock & Oak planner, use code KBSAVE10 for 10% off your order!
Step 2: Identify Your Time Blocks
To create time blocks specific to your schedule, pull out a scrap sheet of paper and brainstorm everything you do in a typical day. EVERYTHING. Don't hold back!
Then combine what you can into main categories. These will become your time blocks.
Ideally, you should have a mix of:
- Event blocks (hard start and end times)
- Routine blocks (your regular routines)
- Task blocks (for all your tasks!)
I like to create multiple Google Calendars to correspond with my time blocks so I can toggle individual calendars off and on, as well as color code them. This is so I can easily see what those blocks represent at a quick glance.
Color coding is also helpful if various family members have vastly different schedules.
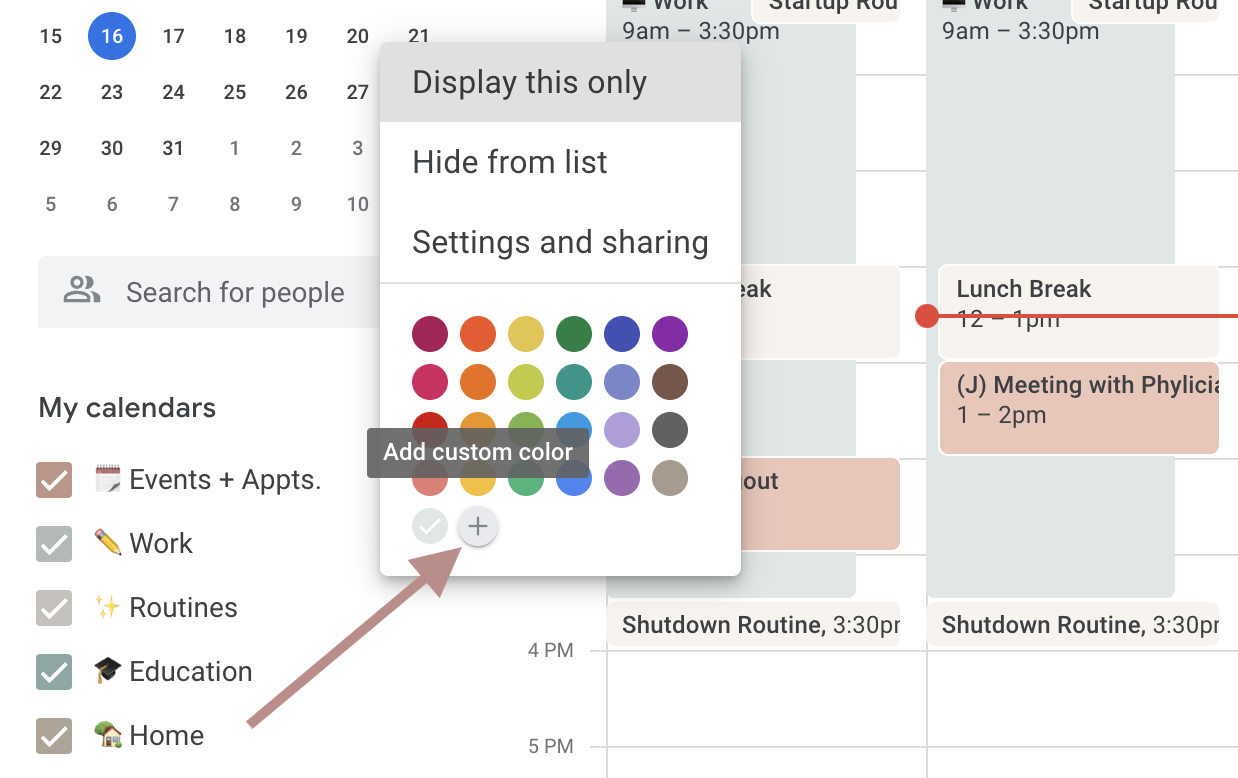
You could technically use just ONE calendar to color code—GCal offers 11 different colors for you to choose from—but the colors are NOT the most calming. When you create individual calendars, you can choose your custom color palette!
Just click the three dots next to the calendar and choose the “+” icon to add a custom hex code.
Here are my separate calendars/blocks:
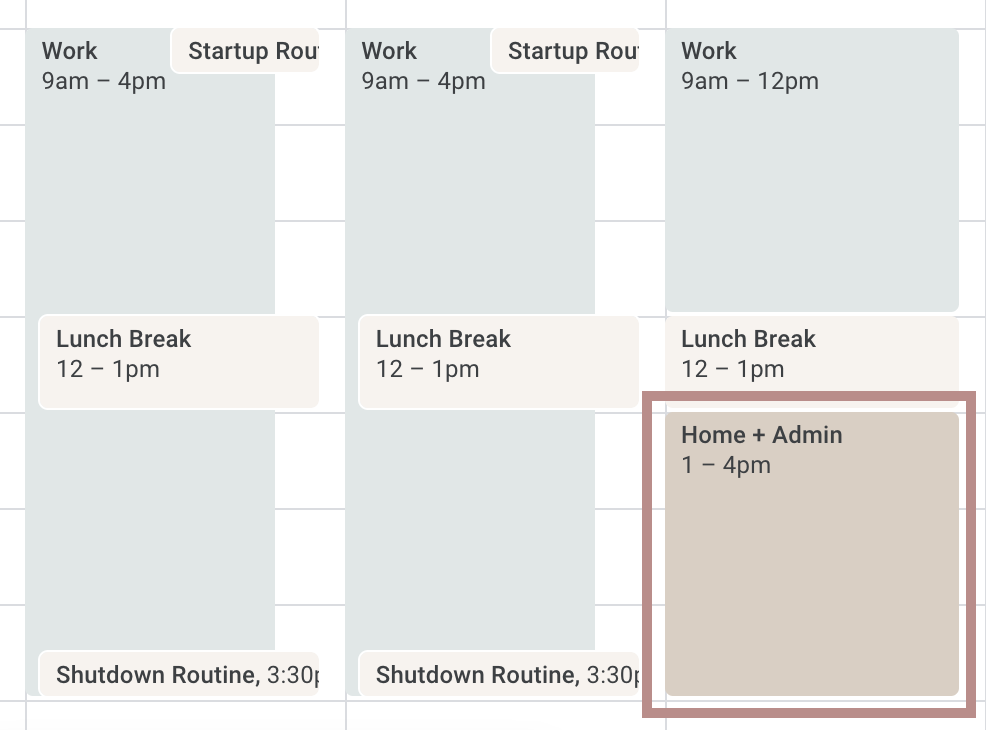
- Events + Appts. This one is pretty self-explanatory. I use this block for anything with a specific start and end time.
- Work. This routine block defines my work hours throughout the week. The reason why it's separate from my actual Routines calendar is simply because I wanted two different colors to show during the week—Work AND my regular routines.
- Routines. My morning, lunch, evening routine, start up, and shut down routines.
- Education. I'm a big believer in continual learning, so I'm always in the middle of a course or two. But I never set aside time to actually finish these courses until I time blocked it!
- Home. All the home tasks! Planning my week, cleaning, RV projects, etc.
- Tiger Time. Amy Porterfield coined this term to illustrate how fiercely you should protect this time—like a mama tiger would her cub! I use this block to work on my writing projects or to do any strategic planning. Basically anything that requires major focus.
- Theme Days. I practice day theming and like seeing those themes called out at the top of my calendar.
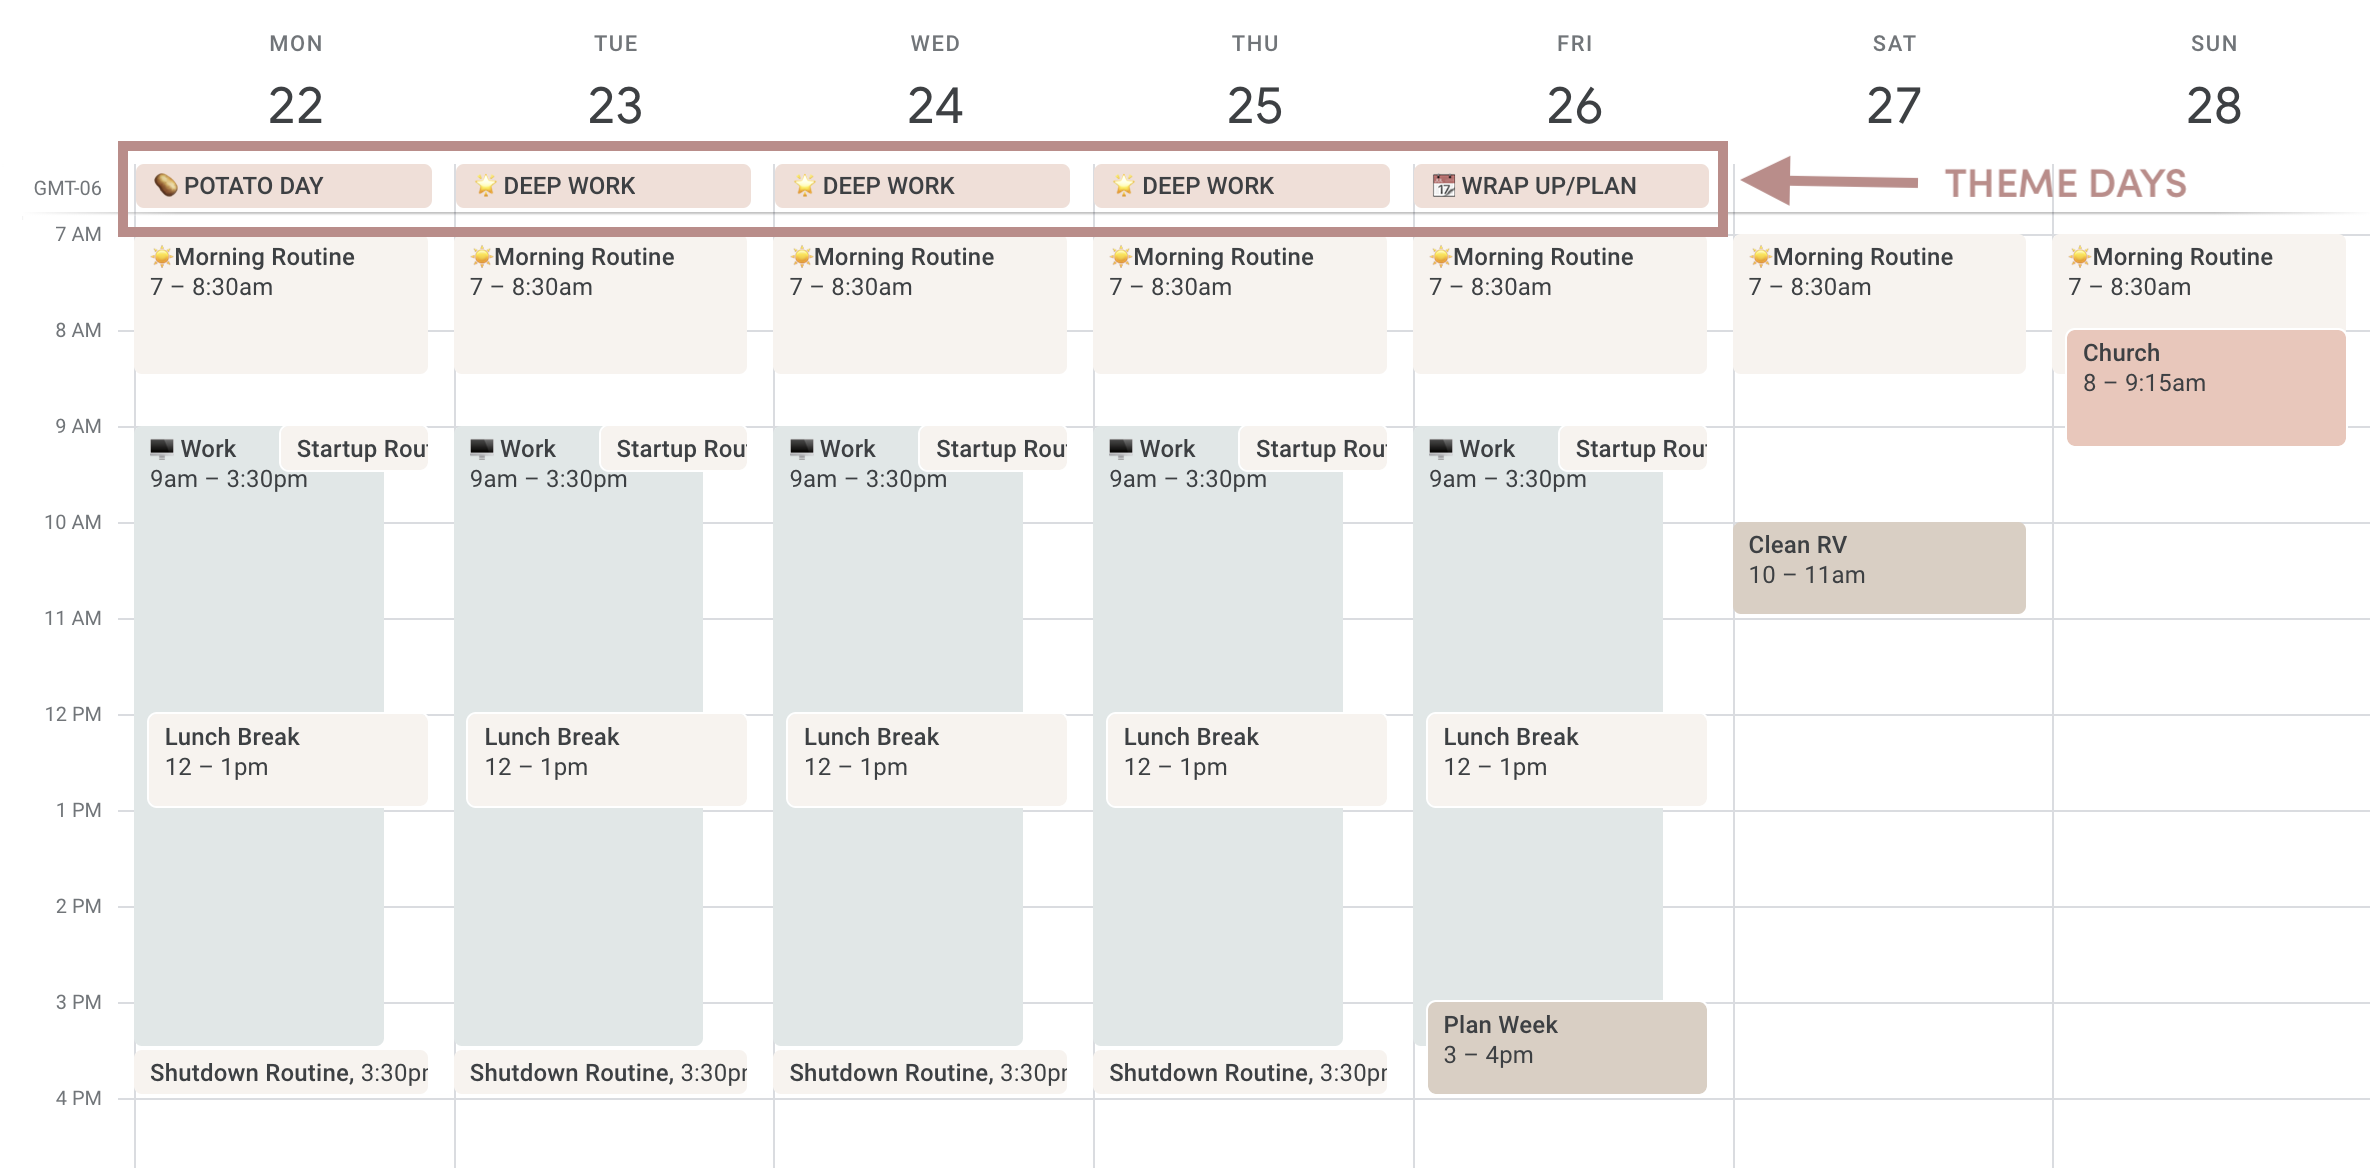
- Open Roading. Any tasks related to my travel brand.
- Birthdays. Self-explanatory.
- Travel + Activities. I put errands in this category as well as our RV travel days and adventures.
- Tasks. I don't use this calendar, but I can't get rid of it because it's a default setting within GCal. Here's how I use Notion to capture all my tasks!
Remember that your calendar blocks will probably look very different than mine (or your best friend's or sister's or mom's!).
We all have very different schedules and responsibilities, which will be reflected in how we plan our time.
So feel free to use my time blocks as a starting point, but don't be afraid to add your own!
Step 3: Create Your Default Weekly Schedule
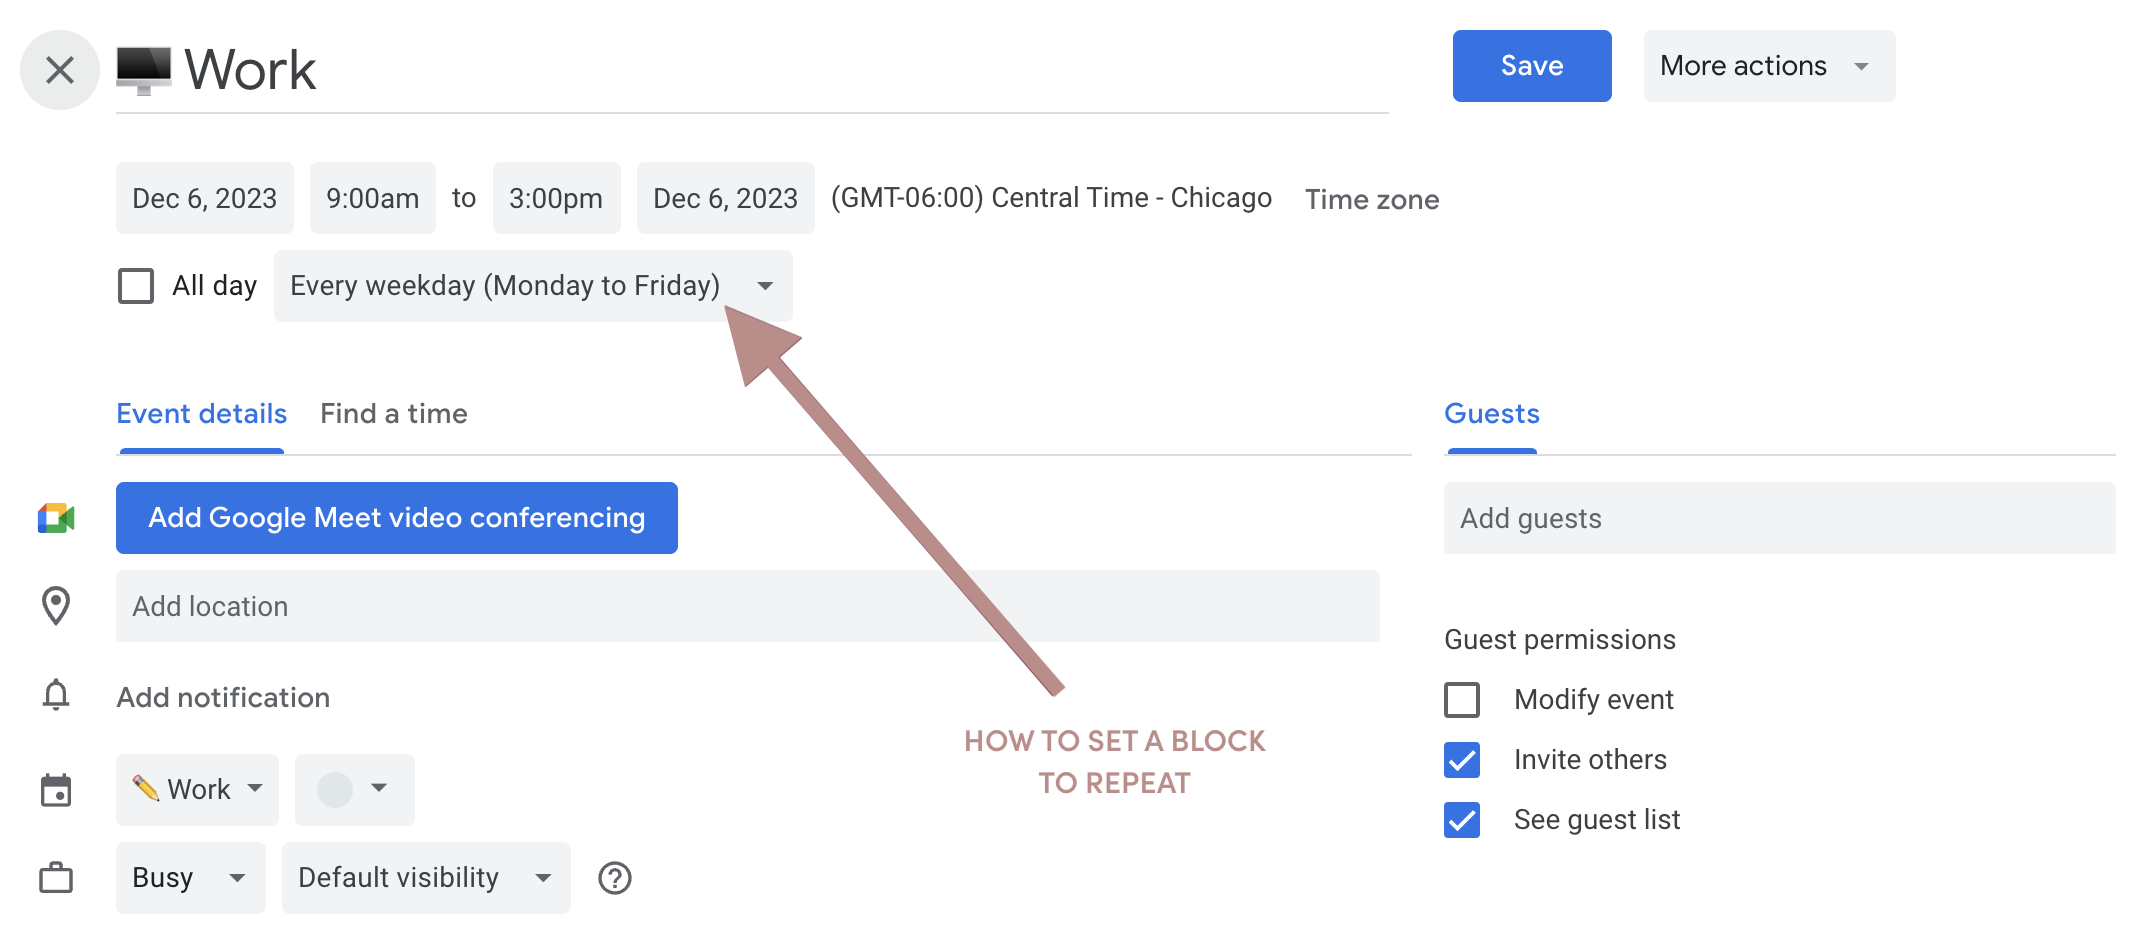
The other benefit to time-blocking Google Calendar is you can create a default schedule that repeats every week.
Just open up the event and click the drop down menu that says “Does not repeat”. Google Calendar gives you a few different recurring options, but you can customize your own too.
Need an event to occur on the third Thursday of the month? GCal can handle it!
The main benefit of creating a base template for your week is that you don't have to start from scratch. You'll want to include events and routines that stay pretty much the same week to week so you don't have to add them each time.
Once I’m done planning my week in Notion (basically, figuring out what workouts I want to do and what tasks I want to tackle that week), then I can go into Google Calendar and start rearranging my days based on what I have going on.
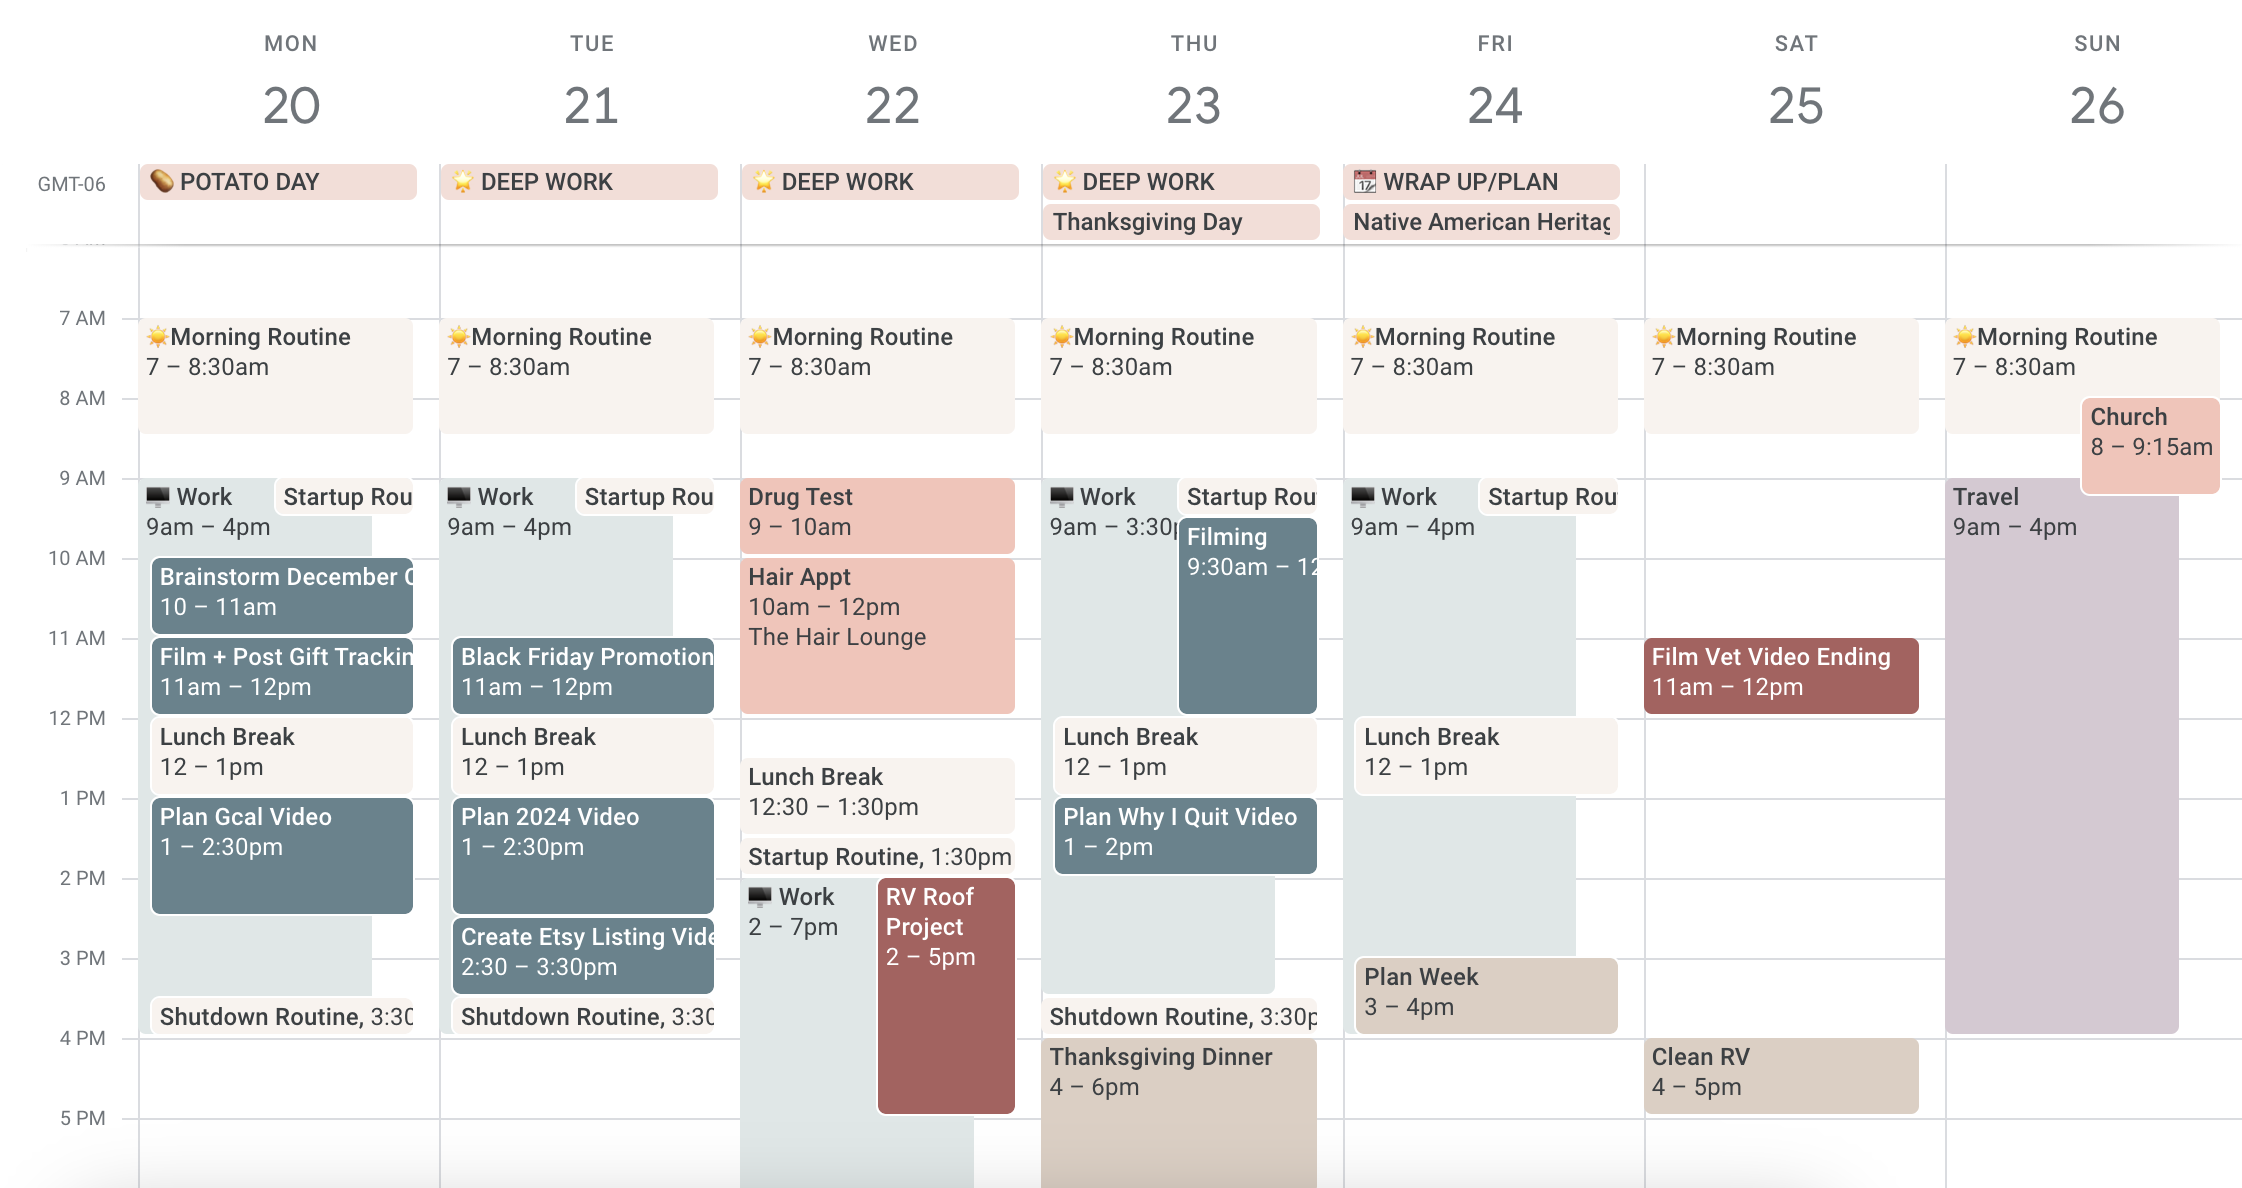
Here's what a “blank” week looks like for me.
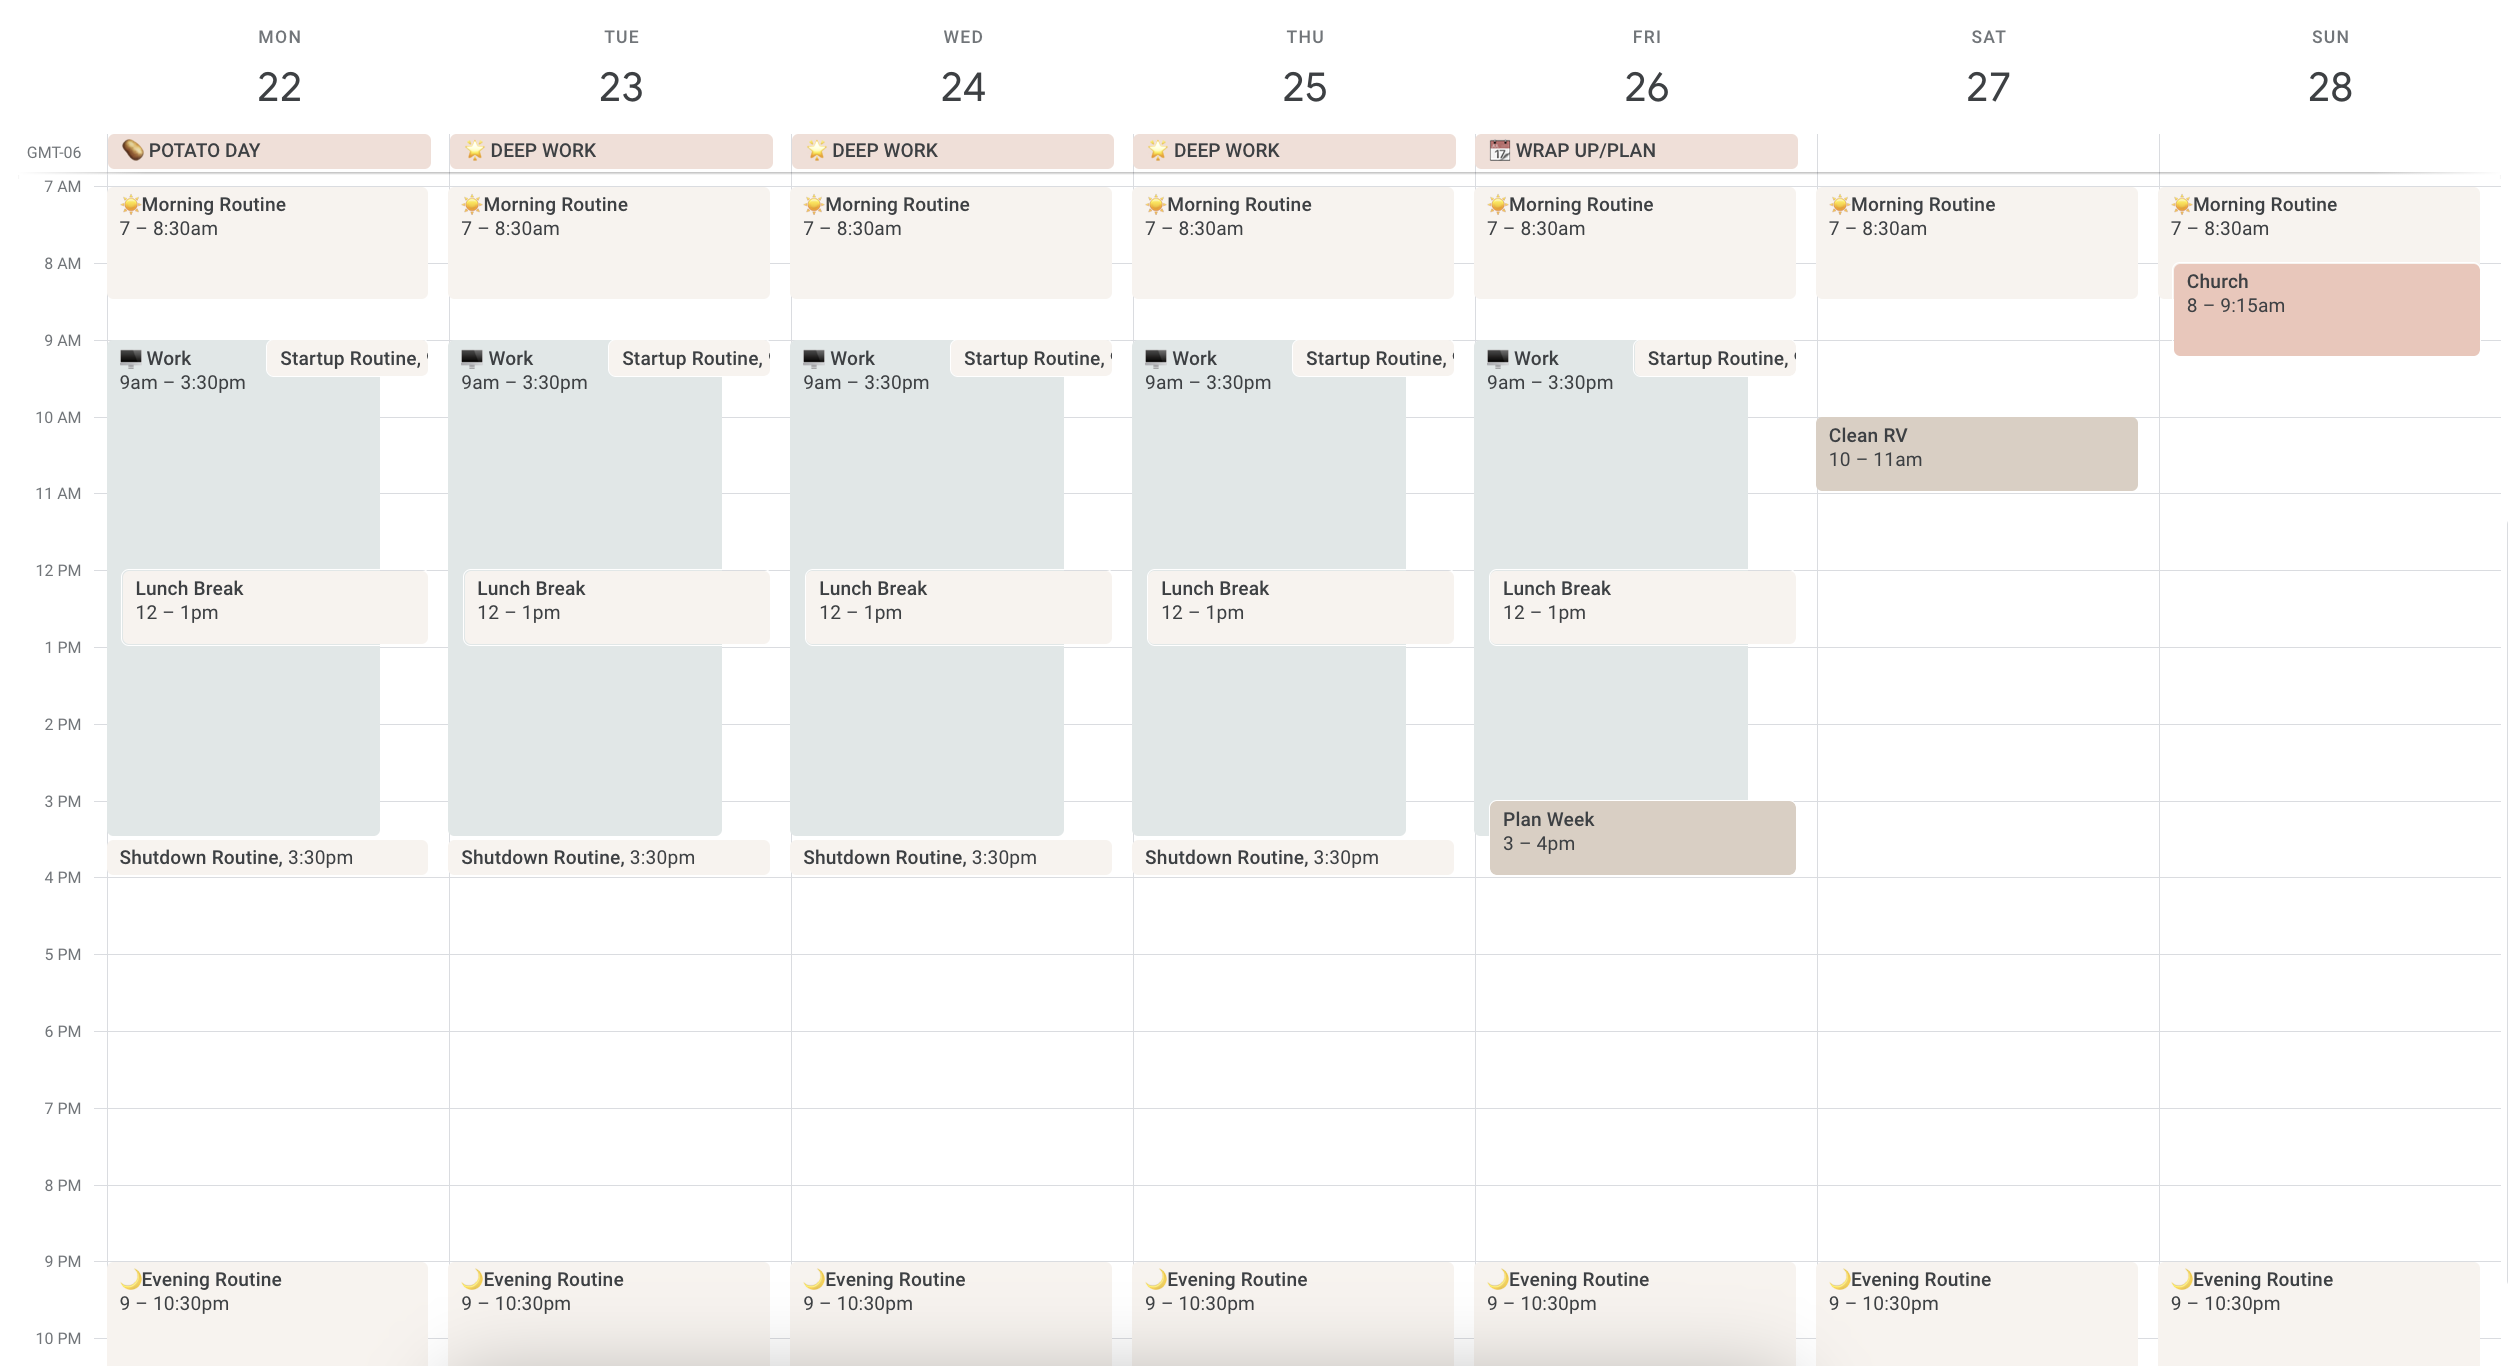
And here's what a week looks like after I time block it according to that week's specific schedule and layer my task blocks on top.

Now when I glance over my daily to do list, I know exactly what I need to do first based on where it lands on my calendar.
The last step is to look over your time-blocked schedule in Google Calendar the night before, adjust as needed, then write out your next day's to-do list based on what you'll do within each block.
FYI: This weekly layout is the only view I can use in Google Calendar. Others are not that helpful because I have SO many time blocks! I don’t want to toggle each calendar on and off just to see my main events in a monthly calendar view. But at least you have the option to view your calendar in different ways if you want.
These Time-Blocking Tips are Pivotal to Your Success
If you want to make the most of time blocking and be successful with it long term, the following best practices are essential to follow!
1. Ideally, you want to make sure each time block is at least one hour or more so you don't break up your day in teeny tiny 15-30-minute increments. The more you micromanage your schedule, the more frustrated you'll be when things don't go according to plan! The only time I would break this “rule” is if there's an activity or task that won't get done unless you assign a time block (like a 30-minute workout).
2. Tailor your time blocks to how your energy levels ebb and flow throughout the day. For me, the two-hour window from 10 am-12 pm every day is when I'm most awake and able to concentrate. That makes it the perfect place to add a Tiger Time block. But by 3 pm, I'm losing steam, which is why I tackle things like email in the afternoons instead of bigger projects that require major attention.
If you're curious what your best time block is, you can track your energy levels using this FREE Notion template.
3. Leave white space between blocks. Give yourself transition periods between blocks where you don't have anything scheduled. This will help you maintain a realistic plan of action for your day. It's always better to be under schedule than over schedule!
Likewise…
4. Always schedule in more time than you think the task or project will take. This eliminates overwhelmed AND disappointment when you get interrupted or don't get everything done like you thought you would. It might be helpful to track your time for certain tasks (I use the app ATracker) so you know how much time to block off.
5. Set timers, but only if they WON'T stress you out! Use your built-in phone reminders to ding 15 minutes before a block is done as a reminder to wrap things up and get ready for the next block.
Want to level up your productivity? Try combining time-blocking with this Pomodoro Timer App!
Remember, time blocking is a framework! And it should be flexible enough for you to arrange as you please depending on the day.
If at any time, your time-blocking schedule causes undue pressure, look through the best practices above and see if you need to retool anything a bit.
My guess is you'll need to add more margin or buffer into your blocks for that extra breathing room, but after a few weeks, the anxiety about how much you have to get done will lessen and you'll feel more in control of your time!
more posts about
Digital Organization
What are your thoughts on time blocking?
Have you ever tried this productivity strategy before? Let's chat in the comments!
Disclosure: Some of the links in the post above are affiliate links. This means if you click on the link and purchase the item, I will receive an affiliate commission. Regardless, I only recommend products or services I use personally and believe will add value to my readers. Read my full disclosure policy here.
I love how much detail you go into in this post! I definitely want to try this out. I already tried doing a time log, to see how I spent my time for a week, so now I want to try this out to see how much more productive I can be! 🙂
– Pixie | Productive Pixie
I think you’ll love it!!
Hi, Kalyn! It looks like all of the download links on this page are broken–would love to be able to download the worksheets!
Oh no! Thanks for giving us a heads up. If you send an email to [email protected], we’ll be sure to get you those printables!
I’ve used this method for over forty years and still do now that I’m bullet journaling. I started while a student at UCLA and needed a plan to get my schoolwork done and also get to my part-time job daily. I found that if I set aside a particular block of time on a particular day, I could complete the task during that time period. I think a lot of it is psychological, but who cares, if it works. For example, I would set aside three hours on Thursday in which to outline and draft a paper that was due on Monday, and that’s exactly how long it would take me! Then I would set aside two hours on Friday to revise and proofread, and that’s exactly how long it would take me. Finally, I would plan to type it at the library on Monday in a two hour block, and turn it in later that day. Of course, it’s much easier now with computers, but the mind will adjust its pace and performance to the time allotted to the task.
Yes!! Work always expands to the amount of time you have available! I love that you were able to find success with this method even years ago.
I’m trying this with the kids this week. I’ve been creating a schedule for each one of us, then one for me. Something hasn’t been working with it, though, and I think it’s the rigidity of it. Thanks to this post, we’re trying time blocking to see if it offer the flexibility that we need. We’ll see how it goes!
I hope it helps!